Wednesday, May 4, 2011

Aspirin Face Mask

On the recommendation of my friend Niki (check out her blogs here), I decided to try this aspirin face mask. This blog is a first and a last—it is my first blog written on recommendation from someone and it is the last blog I will be posting. This is the eleventh blog in the 7/11 extravaganza! 
The Recipe:
I did a quick search to find some good recipe hints. I had heard that aspirin masks can get flaky (like my last escapade with the baking soda). The remedy was to add some honey to the mixture. This holds the mask together and keeps it from drying out. 
My Recipe Suggestions:
Here’s my advice: smashed the aspirins under the bottom of a cup. Make sure it’s glass—if it’s plastic, it might crack…farewell, green cup! A sturdy ceramic mug is probably a good idea as well.
How to Use:
This turned out to be a pretty runny mask, even though most places tell you to make a “paste.” However, I think to make a real paste, you’d have to use a ton of aspirin. So, I’m okay with the runniness, just be warned it will be somewhat drippy while on your face.
After the Mask:
Wear this mask for twenty minutes, then remove by scrubbing off in little circles while rinsing with warm water. Follow this mask with a facial moisturizer.

Ease: This mask was actually much more simple to make than I had anticipated. Using chewable aspirin probably helped since they were easier to crush.
Effectiveness: A great mask to end a good run with the extravaganza. Smoother skin and smiling face.

Your Turn: My extravaganza may be done, but yours could just be beginning! Give one (or more!) of these masks a try and let me know what you think.


Tuesday, May 3, 2011

Baking Soda Face Mask


Everyone from Kate Middleton to the girl next door worries about their skin. This is why Kate visited a spa before her Royal Wedding for an oxygen facial treatment. It is also why you’ll love to try this baking soda face mask. It may not be as high-tech as Kate’s oxygen-gun administered treatment, but that doesn’t mean it won’t work!

The Recipe:
This recipe is from livestrong.com and is mega-easy. Baking soda plus enough water to make a thick paste is all you need to get going.

My Recipe Suggestions:
Add water slowly. You need less than you think! Also, make sure the water is warm. This just makes the mask more pleasant to apply.

How to Use:
Application was pretty easy, though I recommend doing it over the counter since it wasn’t a pristine process. As soon as the mask started to dry on my face, it also started to flake off. So much came off that I didn’t even wait the full twenty minutes. After fifteen, I had a whole pile of baking soda all over my desk, shirt, and lap from it falling off. But the mask still felt great! Somewhat tingly. It felt like my face was being oxygenated. So take that, Kate!

After the Mask:
Removal was simple. No clogging drains and no fuss. And washing the baking soda off was almost like using a gentle facial scrub. However, cleaning up all the powder and pieces that fell off required a bit more clean up.

Ease: Making the mask is so quick and simple! Keeping clean while wearing it proved to be a bit of a challenge.
Effectiveness: So great! Definitely apply moisturizer afterward though otherwise this mask may dry out your skin.


Your Turn: The thick paste reminded me of the corn starch and water “goop” that we made in elementary school. What ooey-gooey projects do you remember from the good old days?

Wednesday, April 27, 2011

A 2 Parter! Egg White and Yolk Facial Mask

A homemade egg white and egg yolk facial that takes a bit of time, but is worth the wait.


The Recipe:
This recipe is from makeup-care. There are actually two parts to this, which I like because the first part uses an egg white and the second half uses the egg yolk. No waste!

My Recipe Suggestions:
I didn’t cook my oatmeal first and instead lessened the amount and added enough hot water at the end to make the mask hold together. If you’ve never separated an egg before, watch this YouTube video.

How to Use:
I found getting this mask on my face to be extremely difficult. It kept falling off, even five and ten minutes after it had been applied. This meant I was stuck hovering around the sink waiting for pieces of fall away. The good news: I got my dishes done. The bad news: I was a prisoner of the sink. 

A quick application of part two, the egg yolk, was much easier than part one. As it dried, my face was most certainly frozen in one position. Having a conversation would have been difficult with the egg yolk on.

After the Mask:
After part one of this mask was done, my face was feeling pretty good. It was definitely glowing more than before. Because part two was tight on my skin, it felt good to get it off at the end of the half hour. More than that, my skin felt great after!

Ease: Not the cleanest mask I’ve tried so far. It’s hard to get it to stick.
Effectiveness: This mask was a bit more time-consuming with its two part series, but it felt really great during and after.

Your Turn: When I was a kid, I always loved to play with face paint. Part two of this mask reminded me of that as it dried and crinkled on my face. Did you ever play with face paint as a child? Or perhaps you were like my brother and used Mom’s makeup as “face paint”?

Tuesday, April 26, 2011

Fight Acne with Strawberries?


Can a homemade strawberry face mask facial fight acne? Despite a few negative reviews from people who have tried this mask before, I decided to go for it and see what my own results were. All I can say is: they were right. RUN FOR THE HILLS, PEOPLE! (Well…sort of…)

The Recipe:
This recipe is once again from Julyne Derrick for about.com.  
It does involve some strawberry mashing, which was a but more time consuming than I had anticipated (of course, I had anticipated a very short time). It also feels a bit like making an Easter dessert, but who can complain about anything dessert-related?

My Recipe Suggestions:
I used sour cream for my mask, but I probably would have preferred to use yogurt if for no other reason than it smells better. As for the strawberry mashing, use a fork (I gave it a valiant effort with the back of a spoon...).

See how happy I am before the mask comes off?


How to Use:
Spread on and wait for 10 minutes. As this mask dried it turned brighter pink. This concerned me since a couple reviews mentioned face-dying. And frankly, I don’t want to be an Easter egg. But I stuck it out for the sake of saying I followed all the prescribed directions and giving the mask a fair shake.


After the Mask:
See how incredulous I am after?

This is the part where I panicked. Yup. Pink skin, but only where the mask had been. If you ever need to fake a sunburn or play a Wilber in Charlotte’s Web then this is the mask for you. Other than that, NOT GOOD.

After initial panic, I washed my face with copious amounts of water, applied my moisturizer and waited. Sure enough, given some time the pink face phenomenon faded (how’s that for alliteration?). But the emotional stress caused certainly isn’t worth the masks benefits (which even after the pink-dye faded weren’t stellar).


Ease: The strawberry mashing process takes a couple of minutes (and if your strawberries aren’t ripe, I imagine it would be even more difficult) but other than that it’s easy.
Effectiveness: NOT. My skin felt tingly and oh, yes, pink. I don’t know what you prefer for clear, happy skin but for me “pink” and “red” are words to avoid, even if it is only for an hour or so.

Your Turn:
This has been a wonderful internet-suggested fail for me. Has anyone else experienced a homemade, DIY failure before? Don’t say I’m alone in this!

Wednesday, April 20, 2011

Cornmeal Face Mask Scrub

Ladies and gentlemen, we have a contender! After 6 homemade face masks, I’ve finally found one that can compete with the awesome oatmeal and honey face mask (which was my very first post). This cornmeal face mask scrub helped my skin feel so much better after several late nights and early mornings that were taking their toll on my face.

The Recipe:
This recipe is from a website all about organic, natural living called Care2. They have several different facials listed, but the one I chose includes cornmeal, honey, and yogurt.

My Recipe Suggestions:
The website doesn’t give proportions for the three ingredients. I used 1½  tablespoons cornmeal, ½ tablespoon yogurt and ½ tablespoon honey. I mixed these three together until they formed a thick paste. But feel free to experiment!

How to Use:
This face mask is a bit different from previous ones because it is also a natural facial scrub. To apply, then, I rubbed in gently in small circles on my face for thirty seconds. After this, I let it sit for fifteen minutes. As far as application goes, this mask may be the cleanest and easiest one so far. No mess, no fuss.

After the Mask:
Part of the easy of this mask is that I could rinse it off right into the sink. No messing around with clogging drains like some previous times (here, here, here...) I scrubbed it off gently while periodically splashing with water.


Cost: 1½ Tbsp Cornmeal – approx. $0.06
          ½ Tbsp honey – $0.05
          ½ Tbsp Yogurt – approx. $0.05
Ease: This is another one-dish mask that you can whip up in seconds. The measuring is relaxed too, so there’s no need to get stressed over anything with this one.
Effectiveness: So good! My skin feels so much softer now than it did before! This mask even helped smooth out some of the more obvious blemishes present.

Your Turn:
When I hear cornmeal, I immediately think cornbread. This makes me think of chili. What’s your favorite cornmeal food?

Monday, April 18, 2011

Yogurt and Oatmeal Facial (No, it's not a parfait!)


The Recipe:
Another about.com find! This one's written by Julyne Derrick. It's really simple—only three ingredients. A tablespoon of oatmeal to a tablespoon of natural yogurt and a few drops of honey are all that is needed for this (great smelling) face mask.

 My Recipe Suggestions:
 I grabbed my yogurt right out of the fridge and let me tell you, it was C-O-L-D! Next time I’d let it warm to room temperature before mixing it in. The recipe also calls for the oats to be ground finely, which I didn’t have the capabilities to do. The whole oats made for a more difficult application, but it’s doable with some patience.

How to Use:
Simply apply and wait! If you didn’t get to grind the oatmeal (like me), applying the actual oat part can be difficult because it likes to fall off. Be patient and try to get the oats to stick. Once it starts drying, they’ll stay put.

After the Mask:
As with my previous oatmeal face masks, I took off the larger pieces before rinsing my face to avoid clogging the sink. The mask was definitely dried and crisp after 15 minutes, but it felt good on and my skin definitely feels happier than it did before. It feels less oily and more tightened.

Cost: Drops of honey—I have no idea how to calculate this…I got a 24 oz bottle for $4.69
        1 Tbsp Oatmeal approx. $0.01
        1 Tbsp Yogurt – approx. $0.09
Ease: This was too easy. Definitely a quick one to whip up when you don’t have a lot of time (or dishes).
Effectiveness: Oatmeal seems to be a winning ingredient across the board! I’d use this one again.
Stress Relief: It was nice just to sit still and let this one dry. It’s one that you don’t want to move your face a lot with it on, so it almost forced me to chill for a while.

Your Turn:
It’s time for you to get in there and try one of these facials out! Pick one that I’ve tried here (or one of your own that you’d like to recommend for me to try!) and post your review here. I’d love to hear from you!


Wednesday, April 13, 2011

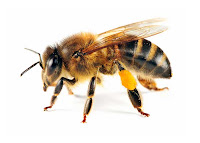
Ode to Honey Bees: Homemade Face Mask

Photo from http://amazinghoneybee.com/contact_us
Honey bees are a vital part of the ecosystem. Without them, pollination doesn’t occur, plants don’t grow and things collapse from there on up the food chain. Not to mention that without honey bees we wouldn’t have any honey!

Check out this article from AOL news about honey bees (and other declining creatures) in the recent years past. 

Honey is a fantastic natural skin care product because it is a humectant, which means it helps your skin retain moisture so it is soft, supple, and oh-so touchable. As an ode to the honey bees and all they do for us, this post’s face mask is honey-heavy.

The Recipe:
This recipe, in fact, it is so honey-heavy you might say that it is only honey! That’s right!
I got the recipe (if you can call it that?) from natural home remedies for life, which has a plethora of other face mask recipes you can try too!

My Recipe Suggestions:
I microwaved my honey because I didn’t want to play the hot water trick. It only took about ten seconds to get it quite hot (I let it cool a bit before applying it so it wouldn’t burn).

How to Use:
I applied with my fingers, which worked well but definitely resulted in sticky hands and random drips. A quick application that felt great as the honey calmed my skin with warmth and my senses with sweet scents. Watch for drips while you wait out the 15 minutes after applying!

After the Mask:
I expected a battle to get the sticky honey off at the end of this. However, I was pleasantly surprised when warm water did the trick without much work at all. My skin feels a little better to me, but doesn't feel better to the touch. This definitely made my skin appear more red for about 30 minutes after removal.

Cost: 1 oz honey approx. $0.20
Ease: This was so quick to make! One ingredient, ten seconds to microwave, apply and remove. Simple.
Effectiveness: Felt great while it was going on and there was a bit of pleasant tightening while the 15 minutes passed. Afterward, my skin felt good to me, but appeared more red than usual for about 30 minutes post-removal. This is a good quick-fix for a day when you want just a little extra something special for your skin, but isn’t a deep cleanse and isn't something you should do just before your date arrives to pick you up!
Honey Bee Ode: Sweet but not entirely effective. Maybe I'll leave saving the honey bees up to the experts.